Diagrams & Plans


Loop Detectors & Driveway Loops
Making Common Sense of Loops
Inductive loops or “sensing loops” as they are commonly referred to, have become an integral part of automatic gate systems and other aspects of our everyday life. For example, every time you pull up to a stoplight, you “trigger” a loop, which in turn engages a timer or switching device to change the lights and get you on your way. Loops are used to stop or reverse a moving gate, to allow free exit from or entrance to a site, or as an “arming loop” to allow entrance with the use of a transmitter or some other access control device.
A loop is made from a continuous run of wire with no splices, which is typically wound in a rectangular shape and saw-cut into the existing pavement. In some instances prefabricated or “pre-formed” loops can be installed before paving or pouring concrete on the roadway. The ends of the wire are brought back to the gate operator and attached to a loop detector. The lead-in or “home run” from the corner of the loop to the detector must be twisted a minimum of five times per foot. The detector powers the loop causing a magnetic field around the wire. The loop then tunes to a resonate frequency and the detector constantly monitors the frequency for changes. When a vehicle enters the loop, the frequency increases causing the detector to send an output to the gate operator.
The size of the loop depends on the job conditions. Variables include driveway size and the typical size of vehicles expected to pass through the gate system. When sizing your loop, a good rule of thumb to follow is: The height of detection is equal to approximately 2/3 the length of the short side of the loop. For example, a 4′ x 8′ loop will give a detection height between 2-1/2 and 2-3/4 feet. For high bed vehicle detection, the typical loop size is 6′ x 8′.
The number of turns in the loop is determined by the size of the loop. Multiplying the length by the width will give you the loop area in square feet. A loop area of 12 to 60 square feet requires four turns. An area of 60 to 240 square feet requires three turns. Adding turns to a loop does not increase the sensitivity, but will make the loop more stable if the lead-in is longer than 400′. The size of the loop also determines the loop placement. The larger the loop, the greater the spacing must be between the loop and the gate. Essentially, loops should be placed a minimum of 4’ from the gate.
When connecting more than one loop to a detector, always connect the loops in series. The correct phasing of the loops is important if the loops are close to each other. The sensitivity setting on the loop detector should be increased when adding loops to the same detector.
It is important to use the correct wire in your loop installation. A 14, 16 or 18 AWG stranded wire can be used. The insulation on the wire should be XLPE (cross-linked polyethylene). This insulation has a high resistance to water, heat, abrasions, oils, and gasoline, each of which can cause false detections.
There are several factors to consider when actually installing the loop. For example, the wire should be buried a minimum of 1″ below the roadway, but no more than 6″ deep, and should be secured in place by a backer rod and then the desired sealant for your application. In addition, when saw cutting for your loop, cut the corners at a 45-degree angle instead of 90 degrees to reduce stress and abrasion of the wire. If the wire is cut or nicked, it will eventually cause false detections which in turn cost you service calls. Finally, when using more than one loop detector in the same installation (i.e. a reversing loop and a free exit loop) the frequency settings on the detectors should be set differently to avoid “cross-talk” which can cause false detections.
Wire connections are also critical to the installation procedure. Whenever possible, the connections should be soldered together instead of using a wire nut or crimp connector. Loose connections can cause false detections and over time may show signs of corrosion.
When trouble shooting loops, the best tool to use is a megohm meter. After disconnecting the loop from the detector, place one lead of the meter to one of the lead wires of the loop and the other to earth ground. The resistance should be greater than 100 megohms. A reading between 50 and 100 megohms means the wire insulation may be nicked or cut and the loop is questionable. If the resistance is less than 50 megohms, the loop is shorted to ground, and must be replaced.
Most loop detectors have built in diagnostics which can identify problems in the detection system. A series of blinking LED’s is an indication of possible loop problems. If this occurs, the detector must be reset to continue normal operation of your system. Full diagnostic detectors are available for problem sites. These units can keep track of shorts or intermittent problems that may temporarily correct themselves and should help determine the condition of the loop. Hopefully, the information provided above clarifies any questions involving loop detectors and their installation.
The following types of loops are commonly used:
Reversing Loops are used to stop or reverse the direction of an automatic gate or barrier operator.
Free Exit (Egress) or Free Entry (Ingress): used to open an automatic gate or raise the arm of a barrier operator.
Shadow Loops are used in swing gate applications. This loop is placed inside the swing area of the gate and is only active when the gate is in the fully open position and will not allow the swing gate to close.
Close Loop used in barrier operator applications. This loop is placed directly under the arm of the operator. When the vehicle clears the loop, the arm automatically lowers.
Arming Loops are used to control access to a site. The vehicle must drive onto the arming loop before using an access device such as a transmitter or card.
Loop wire has special impermeable insulation and is inserted into slots that have been cut in the asphalt, or concrete. The loops are sealed with loop sealant
Recently thinner loop wire has become available that can be installed in a 1/8″ wide slot. This size slot can be made with a Skill saw with a 7 1/4″ diamond blade.

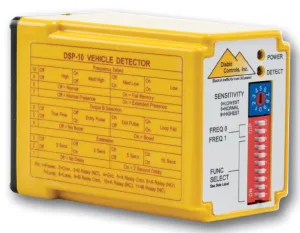
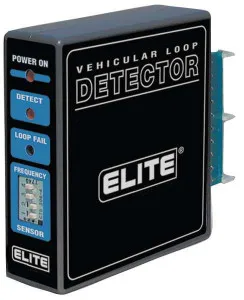
Loop detectors are used to detect the presence of vehicles. The loop is connected to the detector.


Exit loops are used to open gates to allow a vehicle’s exit.
Safety loops are used to prevent a gate from closing on a vehicle. Two loops can be wired to one detector. This is frequently the case in safety loops. Loops are placed in front and behind the gate.
Shadow Loops are typically used to protect the active swing area of a gate to prevent closing on a vehicle. There is no other way to protect this area and it is one of the most likely impact areas that can damage a vehicle (see loop layout diagrams)
Typically the loop is connected to a loop detector (pictured above). Some gate operators have built-in sockets to accept loop detectors and some models require the detector to be wired in.
Preformed loops are placed below the surface prior to laying asphalt or pouring concrete. They are available in several sizes depending on driveway width.

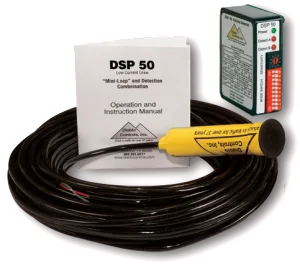
Self contained probe style detector (bottom left) can only be used as an exit device. They are buried a few inches below the surface beside the driveway.

Loop Sealant should be used to seal cut-in loops. The sealant comes in asphalt and concrete colors. It is best to use a commercial-grade sealant versus silicone found in hardware stores.

The following types of loops are commonly used:
Reversing Loops are used to stop or reverse the direction of an automatic gate or barrier operator.
Free Exit (Egress) or Free Entry (Ingress): used to open an automatic gate or raise the arm of a barrier operator.
Shadow Loops are used in swing gate applications. This loop is placed inside the swing area of the gate and is only active when the gate is in the fully open position and will not allow the swing gate to close.
Close Loop used in barrier operator applications. This loop is placed directly under the arm of the operator. When the vehicle clears the loop, the arm automatically lowers.
Arming Loops are used to control access to a site. The vehicle must drive onto the arming loop before using an access device such as a transmitter or card.
Loop wire has special impermeable insulation and is inserted into slots that have been cut in the asphalt, or concrete. The loops are sealed with loop sealant
Recently thinner loop wire has become available that can be installed in a 1/8″ wide slot. This size slot can be made with a Skill saw with a 7 1/4″ diamond blade.

Loop detectors are used to detect the presence of vehicles. The loop is connected to the detector.


Exit loops are used to open gates to allow a vehicle’s exit.
Safety loops are used to prevent a gate from closing on a vehicle. Two loops can be wired to one detector. This is frequently the case in safety loops. Loops are placed in front and behind the gate.
Shadow Loops are typically used to protect the active swing area of a gate to prevent closing on a vehicle. There is no other way to protect this area and it is one of the most likely impact areas that can damage a vehicle (see loop layout diagrams)
Typically the loop is connected to a loop detector (pictured above). Some gate operators have built-in sockets to accept loop detectors and some models require the detector to be wired in.
Preformed loops are placed below the surface prior to laying asphalt or pouring concrete. They are available in several sizes depending on driveway width.

Self contained probe style detector (bottom left) can only be used as an exit device. They are buried a few inches below the surface beside the driveway.

Loop Sealant should be used to seal cut-in loops. The sealant comes in asphalt and concrete colors. It is best to use a commercial-grade sealant versus silicone found in hardware stores.

